Beginners Soap
Ingredients:
Coconut oil = 300grams
Palm oil = 250grams
Olive oil = 400grams
Water = 300grams
Sodium Hydroxide = 138grams
Essential Oil (optional) = 20ml
If you would like to add essential oils to this recipe I would suggest you read the information about fragrances first. The amount may vary, depending upon which essential oil or fragrance you use, but on average I would add 2% of the total of the oils as fragrance or essential oil. Be guided by your nose though, if the essential oil you choose is very strong then you may wish to add less. For this recipe that means 19grams - although not entirely accurate I would use a 20ml bottle of essential oil or blend to a total of 20ml in a small measuring container.

2. Weigh the water into the 'lye pot'

3. Wearing all your protective equipment and following the guidelines on safety, weigh out the Sodium Hydroxide into the smaller container.
4. While still Wearing all your protective equipment open the window or take the water and Sodium Hydroxide outside. Take a deep breath and holding your breath pour the Sodium Hydroxide into the water and stir with the whisk until it is dissolved. This only takes a few moments. If you feel you cannot hold your breath very long then it is perfectly ok to leave the lye pot and move away to take a fresh breath. Once the Sodium Hydroxide has dissolved in the water place the lye pot somewhere safe (out of the reach of children or where accidents could occur) until the fumes have dissipated.

5. If you live in a temperate climate (or if it is winter) the coconut and palm oil will likely be solid. Weigh any solid oils into the Soap Pot and place on a low heat until just melted - do not overheat. (Never leave a pot of hot oils unattended.) Remove the melted oils from the heat and add the cold olive oil. Place a thermometer into the oil pot and register the temperature. Wipe the bottom of the thermometer and move it to the Lye Pot and record the temperature.

6. Temperatures can vary greatly without risk of failure in the soap making process, but for the sake of ensuring a successful beginners batch, you should aim to have both the lye and the oils within a few degrees either side of 50C.
7. Once the optimum soap making temperature has been reached, while wearing your protective equipment, slowly pour the lye into the oils and begin to stir with the balloon whisk or spoon. Stirring should be forceful and vigorous without spilling. As you stir the mixture will thicken slightly. You can speed this up by changing to useing an electric stick blender. Be sure to keep the stick blender in contact with the bottom of the pan at all times and do not switch on until it is touching the bottom and switch it off before you attempt to remove it from the Soap Pot.

8. The mixture will thicken considerably quicker by using the stick blender. Once the thickness is that of a bought custard (traditionally this stage is called 'trace' when a trail of soap mixture forms a worm like shape on the top of the rest of the mixture for a few seconds before settling back into the pot).

9. Although this is a basic soap it is important to note that any extra ingredients are added at 'Trace' and fragrances are always added last of all... just before pouring the mixture into the mould (mold).

Extra ingredients can include colours, scrubbie bits such as oats or poppy seeds. Once you are satisfied that all of the ingredients have been fully incorporated into the soap mixture and it is the required thickness, pour it into the lined mould.
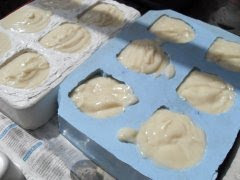
10. Generally at this stage the mould should be covered loosely with a piece of heavy cardboard or wooden or plastic lid and then wrapped in blankets or towels to ensure that it stays nice and warm. The moulds I am using here are silicone ones that do not need lining - and the soap comes out nice and easy too!
Leave it undisturbed for between 12 and 24 hours. The soap mixture continues to 'saponify' or turn into soap during this time. It is not always necessary to leave the soap in the mould for the same amount of time and likewise it is sometimes necessary to leave it slightly longer - it all very much depends upon the recipe and the types of oils used.
11. Because this is the cold process method of soap making, while in the mold (mould) you may find that the soap goes through a 'gelling' phase. This happens when the chemical reaction known as saponification continues in the mold (mould). Starting from the centre, the mixture turns almost translucent in colour and becomes much darker and very very hot. It is simply the cold process soap cooking!
Do not worry if your soap does not gel in the mold, after curing there is usually no discernable difference between cold process soap that has gelled and that which has not.
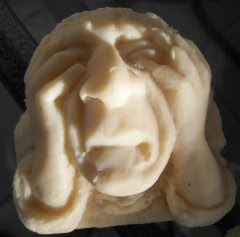
Once the soap has spent the requisite amount of time in the mold you can turn it out and remove the paper. Cut it with a sharp knife if it has been made in a large block and then place the soap pieces in a dry, dust-free environment to dry. The airing cupboard is not always a good idea, somewhere with a free flow of air is better. The soap needs to dry or 'cure' for a minimum of 4 weeks. This can vary but experience has taught me that the best soaps have been cured for at least 4 weeks (and that includes hot process soap!).
The curing time allows for further saponification and evaporation of excess water which ensures that you have a hard long lasting bar. The soap can then be wrapped as a gift or popped into a paper bag and stored for use. Always keep your soap in a cool dark place away from direct heat or sunlight.
Whether its cold or hot process, how much water do I have in a soap recipe? thank you.
ReplyDeleteThe amount of water can vary depending upon what outcome you want. If you follow a basic recipe you don't have to worry about the percentages but you might want to look at the section on formulating your own recipes.
Deleteis it still getting heated when you mix the fats and alkali?
ReplyDelete